Saturday, October 31, 2009

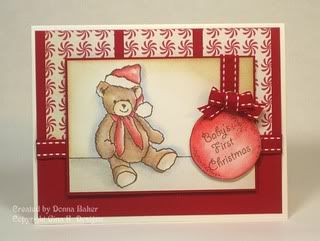
Baby's First Christmas


I just adore this teddy bear Asela illustrated for Gina K. Designs in the new set First Christmas.  Paired with the Cosmo Cricket Jolly by Golly peppermint swirl paper makes for a sweet monochromatic card!  I used this week's SCS sketch layout (SC252). 

I drew in a floor line so the teddy looks like he's sitting near a wall and colored in shadows with my prismacolor pencils.  I used Pure Luxury rocket red & Ivory cardstock and the sponge distressing is antique linen ranger ink. 

I hope whatever plans you have for Halloween, you stay safe!  We are going to John's co-worker's house for an adult/kid Halloween/UT football game/potluck  get-together and it's mandatory everyone dress up (the only easy thing I could conjure up is to wear my long john pj's, slippers, wear my hair in ponytails and carry around a stuffed animal to be a little girl) so that's what I'll do.  Just spending time with his co-workers will be fun enough for me!  Add good food & candy to the mix and that makes for a blast of an evening! Pin It

Wednesday, October 28, 2009

Gina K. Designs Release Day: Winter Friends and Signed With Love


Rupa Shevde has made such a cute set for Christmas with penguins, snowmen and more called Winter Friends

I made a 3-inch card and small pillow box treat to share with you using one of the penguins and Jolly by Golly paper.  It as pretty quick and easy which is great when you think about all the people you'd like to give a little something to for the holidays without breaking the bank!  I put little non-pareil mint candies inside the pillow box. 

Here is the back of my card and treat that I stamped with the One Free with Three set, Signed with Love which is an answer to MANY people's requests from Gina K. (including my own).  She has made a fantastic essential set for us to sign our handmade creations and more!  I just love the versatility of it.  I used 2 different ones for these.


My next creation is a 6-inch scrapbook page I made using a Christmas picture of my sweet niece and adorable nephew for my sister.  Since I was not able to participate in Melanie's preview of Festive Frame, I included it in today's preview.  The reason I was not able to participate was because I was out visiting these sweet kids.  More about that & pictures to share soon.  I am trying to get caught up on stuff right now (including my math homework so time is limited for me). I wanted to show you how quickly this set can be used not only for cards and gift making, but scrapbooking too.  This page was really quick to make! Sorry the tone on tone greeting does not show very well in my photo, I used Celebrate the Beauty of the season on the bottom right corner.  I love how the Cranberry tart matches their outfits perfectly.  These kids are always hamming it up for photos.  I love it and I love them and I miss them. 


Here is the back of my page, I stamped a different image from Signed with Love, isn't that great?  That way I can always document when I made something no my sister always knows.  She saves EVERYTHING. 

Check out the following blogs for samples using one or both of these sets:


Our Release party will be held on Thursday night over on SCS in GinaK's Forum from 7-10 pm CST.  We'd love to have you join in the fun!  There will be contest questions, challenges, chatter, and lots more samples from our designers throughout the party!  See you then!
Pin It

Tuesday, October 27, 2009

Gina K. Preview: First Christmas & Vintage Borders


I am so happy to share with today's previews for Gina K.'s October release which is scheduled for Thursday. 

My first card is for Asela's First Christmas set, for baby's and couple's first Christmases together.  I am using a set of smaller ornaments and decided to put them in Melanie's wine glass from A Charmed Life.  Can you believe how perfectly they fit in there?  Stamping serendipity!  The sentiment 'Feliz Navidad' is in the set, which is perfect to send to my Godmother who speaks Spanish.  I used the Jolly by Golly paper pad by Cosmo Cricket, Rocket Red & pure luxury cardstock, Ivory gold-lined organdy ribbon, flourish punch, holiday button assortment, and holiday metallic paste on the main image, all of which are available in the Gina K. Designs store.    

On my next card, I used Nina's new set called Vintage Borders, a great set of borders that can be used on all occasion cards, as well as Christmas!  I used 2 Christmas stamps on my card - the row of delicate and decorative ornaments and Merry Christmas in different languages which I just love!  The layout of my card is fashioned after the week 4 Viva La Verve challenge!  I did them all this month!  I kept the card clean and simple by not even coloring in the ornaments.  I used Cranberry Tart pure luxury cardstock and Basic Grey Eskimo Kisses paper, in addition to coordinating ribbon from the holiday assortment of ribbon.  This would make a great mass production card! 


For more previews using these great sets, please visit the Illustrators of the stamp sets featured tonight:
We have several of our Center Stage Spotlight Designers joining in the previews:
Finally, stop by these Gina K Designers' blogs for even more projects with tonight's stamp sets:

Our Release party will be held Thursday night over on SCS in GinaK's Forum from 7-10 pm CST.  We'd love to have you join in the fun!  There will be contest questions, challenges, chatter, and more samples from our designers throughout the party!  See you then!
Pin It

Sunday, October 25, 2009

Shabby Chic Ornament & Funky Gingerbread House


Well, the new release sneak peeks will start on Monday (10 pm CST) for Gina K. Designs - I bet y'all are on the edge of your seats to see what Gina, the design team & CenterStage design team have to share with you! 

I realized there were a few cards I still hadn't shared on my blog to show you.  My first card uses the One Free with Three set, Holiday Hospitality.  When you buy three sets, you get this absolutely free ($19.95 value).  I used the new Jolly by Golly Cosmo Cricket paper for the musical score, paper-piecing it for the ornament. I distressed my textile cuttlebug folder with ranger distress inks in antique linen and vintage photo.  The cardstock colors are pure luxury rocket red, chocolate kiss & ivory.


This next set of cards I made use Hip to be square and Holiday Mix set from the Holiday Cheer StampTV kit as well as the Jolly by Golly paper for the background (paper-pieced using Hip to be square).  I also added a few buttons to the bottom from the holiday assortment buttons.

Hope you have a great day & 'see' ya soon!  Pin It

Saturday, October 24, 2009

Halloween Co-Worker Treats


Here is just a small snippet of a project I'm sharing on the SASI blog today - I'd love it if you went to check it out & leave me some stamp love there! 

Hope you're having a great weekend! Pin It

Friday, October 23, 2009

Faith can move mountains


Happy Friday, y'all!  Ever since I have not been playing along with the Taylored Expressions sketch crew, I have been making my samples & uploading way late (such is the life of a student since I went back to college).  But at least playing late is better than never, right? 

This is the card I made for last week's sketch TESC87 using The Places You'll Go and August key ingredients.  Did you see the great October key ingredients available this month?  They are so awesome!  You can see all inspiration from the design team here (follow links on Taylor's post.)


In honor of Halloween fast approaching, we have a Fright Night Special
just for YOU. 


All of our Halloween stamp sets AND the Halloween Key Ingredients are ON SALE for 20% OFF
Friday October 23rd through Sunday October 25th ONLY!


So don't miss out on this last minute holiday deal!


Plus you'll want to check out the TE What's the Deal Department for some incredible deals like JustRite Stampers products at 40-50% OFF!  These JustRite products will not be re-stocked, so grab them while you can!

Hope you have a great day & weekend!

Pin It

Monday, October 19, 2009

Special Delivery/Add-On Hop with Gina K. Designs


It's time for a hop using Tami Mayberry's new sets for Gina K. Designs! 

I wanted to highlight one image for my card but ended up using two, actually.  I wanted to make a clean and simple card and do some fun/wonky stitching I see out there (it was harder than I thought since I naturally try to sew a straight line!).  I used the little polka dot present for my card, stamping it inside the outline rectangle.  I then cut it out real closely and adhered to a rocket red layer and added 2 white mini brads.


This card was easy and fun to make!  I'm sure I will make more to have in my stash when I have time!  I put Christmas red stickles on the polka dot presents to make them pop.  On the inside is where I stamped my greeting, as shown in the 2nd picture. I'm not one to decorate the insides of my cards too fancy - I like to reserve a lot of room for an adequate note to the recipient, but something like this is just enough for me so it's not completely empty!


My next project shows you a fun way to decorate an inexpensive little gift.  I picked up a little snowflake glycerine soap at Michael's from the dollar bin.  I used one of the small boxes that comes in the Holiday Cheer stamptv kit for quick gift giving!  It was super easy to decorate, I just cut a blue cardstock piece to slip inside (I believe it's 3 inches) and put a white snowflake cuttlebugged panel) and for my tag, I stamped the postage outline with london fog memento ink for a soft look and a few other stamps from the set on top - it's so fun to use them. 


I wrapped the box with white gold-lined organdy ribbon.

and here is a view from the back -left open so you can enjoy the lovely snowflake soap!

Tami Mayberry, the Illustrator of these two stamp sets has invited a couple of her friends to join in on the blog hop tonight, so click on their names to see the projects they've created for us tonight: Keri Sereika and Jeanne Streiff

Then, check in on these GinaK Designer's participating in the Blog Hop tonight: Tami Mayberry (Illustrator), Carolyn KingCathy Tidwell, Erika Martin, Jessica Fick, Kurtis Amundson, Lee Murphy, Melanie Muenchinger, Theresa Momber, Kay Simmons


After you're done hopping to all the Designer's blogs stop by GinaK's Idea Center here: Special Delivery and Special Delivery Addition for lots more ideas on how to use Tami's stamp sets. And, don't forget to check in on GinaK's blog so you can leave your comment to be entered as a chance to win these two stamp sets too! Pin It

Sunday, October 18, 2009

TE Sponsorship Challenges - win some TE stamps!!


This weekend Taylored Expressions is sponsoring 2 challenges and you have a chance to win free stamps!  Here are the cards I made to share with you using the parameters and links to the challenges. 

First up is the Cinema Saturday Challenge 54, which is inspired by the movie Finding Nemo with a color challenge of white, coral, light blue & dark blue.  I used the Viva La Verve Week 3 challenge as my sketch with a twist of stamping on fabric!  A few weeks ago I bought more fabric since I am making hair scrunchies right now so I just took a swatch of white cotton fabric to stamp my sailboat image from The Places You'll Go.  I added a sentiment that was fitting for this image from Faith & Hope.  I was reminded of how scared and uncertain it was at times when Nemo's father had set out to find his son.  But in the midst of it all, having the friendship of Dory by his side made it bearable and he gained confidence that he was going to make to find his son.  It was such a cute movie! 
The winner of this challenge will win their choice of newly released sets by Taylored Expressions!!!  You have until Thursday, October 22nd at 9pm PST to upload your creation here
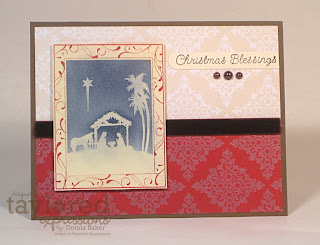
My next card is for the Stamping Sisters in Christ blog challenge #9  This week's challenge is based on Luke 2:11 "Today in the town of David a Savior has been born to you; he is Christ the Lord." (NIV) so I chose to use my new TE set, Christmas Blessings and showcase the nativity scene.  I embossed the image on Choice Buttercream cardstock with clear embossing powder and sponged blue ink for the night sky and red around the border (emboss resist technique).  The pattern paper I used for this card is Christmas Mint.  The chocolate velvet ribbon and Kaiser pearls can be found in the TE store as well.  The winner of this challenge will win this set by Taylored Expressions!  Hope you have a chance to play by 11:59 p.m. PST (GMT -8) on Saturday, October 24th. Be sure to link your creation here
Pin It

Friday, October 16, 2009

Lord of the Season blog hop with Gina K. Designs


Today Gina K. designers, CenterStage spotlight/guest designers are sharing creations made with Nina's Lord of the Season set.  For my card, I used the Vintage Holly digital papers Emily designed last month, along with the holiday tree.  I wanted to this card somewhat of a shabby feel but did not go to the extreme of distressing or sewing.  I just rubbed gold metallic paste on the focal image.  I also strung up some small pearls on the tree and added some red ornaments (rhinestones).  My cardbase & layers are Fresh Asparagus.  My embellishments are buttons from the holiday button assortment. The layout I used is by Mercy Kerin-MTSC43 (I've been meaning to play with her sketches for months now and just got around to doing it, it's a great one!) 

For even more ideas with Nina Brackett's Lord of the Season stamp set, be sure to visit the Gina K Idea Center Lord of the Season

Gina K Designer's joining in on the hop tonight:
Nina Brackett
Carolyn King


Jessica Fick

Lee Murphy
Melanie Muenchinger
Theresa Momber


September's Center Stage Spotlight Team:
and Nina's Guest Designer: Crystal Bernsdorf
Pin It

Center of Attention Product Spotlight - Stencils & Maya Mist


Today some members of the Baker's Dozen are sharing a product spotlight on Crafter's Workshop stencils and Maya Mist, available in the TE Store.

When I brainstormed about what to make for my project, I naturally wanted to make my adorable 3 1/2 yr old niece Gabby a surprise (like I don't make her enough stuff). I made her this cute card using princess cuppie from Trick or Sweet II and personalized it with 'Princess Gabriella' which is what her daddy calls her using my JustRite 15 pt font. My cardbase is regal rose, a great match for the pink Maya Mist I used. 

When I was reading about the Maya Mist, I discovered it can be used on fabric so I bought a white t-shirt at Hobby Lobby and washed/dried it. Then, I laid the floral frenzy stencil down on the shirt (blocking off the areas around it and proceeded to spray the mist all over it (took about 12-15 sprays for good coverage). Then, moved it along and forgot to cover up where I just sprayed (oh well).  By the time I finished, I was a pro at it.  After I sprayed the shirt, I heat set it with my heat tool.  I then finished the shirt with some pink and purple trim from Wal-Mart. The product was easy to use but since the surface is non-porous, when I picked it up, I got the Maya Mist ink all over my hands. Next time, I think I will use disposable gloves or use a tool to pick it up. When I cleaned the stencil, I just ran it under water to re-use it so the ink on top did not transfer to my next area. When completely done, you can rinse with soap and water.  Below are pictures of the steps I took to cover the t-shirt.  Of course covering a cardbase is much quicker and easier, but I wanted to show you how you can make a simple cute gift for a little girl (or boy depending on what stencil you use) for about $2 a gift. 


And here is the adorable recipient of this handmade t-shirt, Gabriella!  I just love this picture her mommy took of her wearing it - doesn't it look like she's saying, 'ta da' or look at me!! 

She was so cute when she got the package and opened it, her mommy asked her if she liked it and she nodded yes with a smile.  "It's my favorite colors!" she exclaimed.  Her mommy said, "Auntie Donna made this for you" and she said, "how did she do that?" and her mommy said "you're going to have to ask her".  So she called me right away to thank me and quickly said, "how did you do that?"  It's incredible how curious she was and recognized the uniqueness of it.  I tried to explain in the most simplest of ways for her to understand.  Then, when her mommy told her they would need to take a picture of her wearing it so Auntie Donna could share it on the computer with her friends, she said "but they can't go in my drawers and mess up my clothes!" She took it literally - lol - her mommy will be sure she sees this post so she can understand better. Gabby, Auntie Loves You!!  You are so precious - I love this picture!  Btw, you like the cute jeans I bought her?     

A SALE FOR YOU!  The products we shared today will be on sale for a limited time (October 16-17) for 15% off!  Here are links directly to the products:

Be sure to visit all the blogs of the talented ladies sharing projects with us today:Taylor, Charmaine, Jodi, Karen G, Laura, Sharon  
Pin It

Wednesday, October 14, 2009

A Very Merry Christmas Hop


Here we are again, sharing creations made with Theresa Momber's new set, A Very Merry Christmas!

I stamped the tree in hunter dye ink and colored it in with peerless watercolors so the ink would blend in more with the watercolors. I used the leafy branch embossing folder on my All Spruced Up textured linen cardstock and rubbed gold metallic paste on it, as well as on the focal panel. My card base is Cranberry Tart and I couldn't help but sew on this card since I have a sew mini at my disposal! I even sewed on the cranberry satin ribbon in a ruffle because I always liked that look, this was a challenge, but not impossible, in fact I like how it turned out! I finished my card off with a few buttons from the holiday assortment of buttons! I love those!! You get a TON of assorted shapes and sizes in a small clear pillow box that is reusable! Genius packaging!

For even more ideas with Theresa's stamp set, be sure to visit the the Gina K. Idea Center here: A Very Merry Christmas. Theresa's tip sheet has been added to the Idea Center as a PDF so you can print out her tips and suggestions for a handy reference tool. We've also included her copic coloring links too.


Pin It

Merry Mass Production- A Baker's Dozen Challenge!


Today, Taylor and some of the Baker's Dozen design team have a challenge for Merry Mass Production to share with you!

We are all aware that as card makers perhaps our busiest time of year for the card giving occasion is Christmas and it can be a little stressful at times to be sure everyone on our list gets a handmade card without putting undue stress on ourselves! Well, we have a few tips to share with you to help you in that area!

Here is a shot of 8 Christmas cards I made in about and hour and a half (once my design was established-which is about as long as it takes me to complete one card sometimes!). I used the newly released Christmas Blessings set and used the nativity and wise men scene for my card, similar to the style for my sneak peeks I shared here (inspired by the full color image on the stamp sheet).

My first step was to pick my layout, which happens to be pretty much the ame one I use when I get into mass production mode-which is on the right. It's very clean & simple yet nice and you can easily make it as simple or detailed as you want it!

My next step was to choose my cardstock, inks and embellishments. My ink was chosen for me because I already had my images chosen (chocolate chip craft ink, embossed with clear embossing powder), 2 shades of blue for sponging the sky and I chose a third color - gold for a rich Christmas feel. My cardstock would be a choice Buttercream base and designer paper is Basic Grey Figgy Pudding. My embellishment is a simple ivory satin ribbon from my stash.


Here are a few shots showing the graduated colors for the night sky. With the wise men image, the light in the sky comes from the moon and light that the led the wise men to baby Jesus. The light in the manger scene emanates from baby Jesus, since He is the Light of the World. Where the light is brightest is where there should be less color. In the first picture, I sponged bordering blue ink around the manger, and covered up the 'frame' with post-it notes.
In my second photo, I sponged night of navy around the top and sides, not completely covering the previous color.


In the last photo, you see how the sponging looks with the post-it notes removed.

Challenge to YOU: Create a set of 4-10 identical or very similar Christmas cards and show at least one photo of your cards in a full group shot. Post to your blog or any on-line gallery and visit Taylor's blog to post a link so we can check out your creations!

Now, be sure to check out all the Merry Mass Production inspiration by the Baker's Dozen:

Charmaine
Dawn
Jackie

Jami
Jodi
Karen M.
Sankari
Sharon
Taylor Pin It

Monday, October 12, 2009

Hip to be square hop: The Best Things in Life...


It's time to hop around the designer's blogs with the new Hip to be square set, illustrated by Melanie for Gina K. Designs!

I wanted to see what fun images from her other sets that could work with this new set because sometimes as an illustrator and designer, she consciously 'plans' for the match ups while others are happy accidents! I'm not sure if she saw this one coming! The bow in her new set matches up perfectly with her onesie in Wee Tees! I used a stamp positioner to line it up perfectly and only had to extend it to the bottom with a brown marker. I used Basic Grey Lemonade paper to stamp the four square, and lined up 'the best things in life {babies} come from God' from The Best Things in Life on my block and stamped it at an angle on the paper. Since I am all about the Janome sewing machine right now, I had to zigzag stitch with brown thread to coordinate. I punched 3/4" of paper to go behind the clear button as an embellishment. This card is so special, but I don't know anyone even pregnant right now to give it to. Oh well, it will be part of my stash.

For even more ideas with the Hip to be Square stamp set, visit Melanie's blog below as well as the Gina K. Idea Center here: Hip to be Square. Melanie's tip sheet has been added to the Idea Center as a PDF so you can print out her tips and suggestions for a handy reference tool!


Pin It

Sunday, October 11, 2009

Monkey Love


I've been very busy making Christmas gifts lately and I have one to show you (actually I made the monkey -click for link to pattern if you're interested in learning more-to give to my nephew Joey a few months ago) but just finally got around to making a card to go with it. I make my niece, his older sister so many things I need to make it a point to find things I can make & send him!!

My sister said he is so active; climbing on things, jumping off the couch arm onto the couch, etc. so she started calling him monkey and he finds it amusing. I can't wait to see him in just a week and a half! I plan on taking my gifts for family with me so that's why I've been busy making sure they're all done so I can save $ on shipping them! I will just wrap them while I'm there.

Of course I had to use my monkey from Beary Special but since I wanted him to be for Christmas, I made a santa hat for him to wear and used liquid applique on the white portions which gives it such a fun dimension to it! Here is a close up of him. I also wanted him to be more Christmasy with a little Christmas tree to hold in his hands from Holiday Wonder. The sketch I used for my card is this week's SCS sketch 249 which was perfect to use elements from my Very Merry Christmas Bundle (currently out of stock) but the cardstock, pattern paper & ribbon can be found in the Christmas key ingredients. I accented the tree trimmings with copic atyou spica pens.

One of the most fun things to do when you have a desire to dabble in more than one craft like I do - is to see how they can compliment each other like this gift! I believe if he likes this monkey, it will be something he will have for a LONG time and will always know his Auntie Donna made it especially for him! That warms my heart!
Pin It

Friday, October 9, 2009

Wings of Joy Simple Card


I have a simple card to share today using the new TE stamp set, Wings of Joy which is such a fun, whimsical holiday bird set! I used the JOY image and added the bigger bird with santa hat to the end of the word. I used all supplies(except the liquid applique on santa hat & labels 7 die) in the Very Merry Christmas bundle which includes the stamp set, the Christmas Key ingredients and MORE! see the picture below---it's a ton of product so you can get a jump start on your Christmas card making - all at a savings of $8!!


Did you know there is an amazing TE Gallery you can check out at any time with inspiring projects made by Taylor & the Baker's Dozen design team? Be sure to bookmark it so you can return to it again and again because we are always adding stuff to the gallery!

This is my first week not posting with Taylor's sketch challenge crew (sad) but I just had to share a TE creation anyway! I'm sure I will be playing with the sketch some time over the weekend. We have a busy one ahead of us with visiting one of John's co-workers to see his gorgeous home tonight. Visiting grandparents in Waco tomorrow and on Sunday, our last AIA home tour before we begin to finalize our construction plans for the home we're building. It's so exciting! We always get so many great ideas looking at all the great architecure.

P.S. for those of you who know (remember) I am back in college, I'm happy to report I got a B on my 2nd Algebra test (I'm determined to get an A on at least one of them!) Pin It

Thursday, October 8, 2009

Masculine Postage


I don't do it often enough but it's kind of fun making masculine cards, you know cards without all the fuss; no ribbon or bling or anything feminine. I always feel such a sense of accomplishment when the card comes out nicely.

This card I made using Mojo Monday sketch 107 was combined with this week's SCS color {CC239} combo of Kraft/Taupe (I used Soft Sand), Mellow Moss & White, which fit the bill for a no-frills masculine birthday card! I naturally wanted to use my new Special Delivery set by Gina K. Designs, in which a lot of the images can be used for a masculine greeting! I used the simple postage stamp with a few postage elements including non-real postage cost and added a little sponging for interest. The gauze digital paper I used is a freebie at StampTV called Summer Fabrics (it's fun to use year-round)! I finished my card off with some white metallic adhesive dots.

Thanks for stopping by - hope you're having a great day! Pin It

Tuesday, October 6, 2009

Meet me under the Mistletoe


Hope you had a chance to check out all the new release items from Taylored Expressions over the weekend. There is such a great selection of product in her store for every stamping whim you have!

I have a fun sample to show you using the Crazy 4 Challenges sketch from a few weeks ago {C4C4} and a few TE sets (new & old) that I combined! I took the smooching cuppies from Love is Sweet, a release for Valentine's Day, the Holly on cuppie from last Christmases' Season's Sweetings and sentiment from the new set Wings of Joy.

The pattern paper I used is the Jolly by Golly paper pad and the rest of the products can be found in the Very Merry Christmas Bundle. Once my card was done, I decided the choice buttercream focal image was a little too stark so I sponged some brick red ranger distress ink around it (a little too heavily, lol) but I still LOVE the card! Can you see the little eyelashes I drew in on the girl cuppie? Too fun--that's why she has the holly on her head. I hope you like my card as much as I liked making it! Pin It

Sunday, October 4, 2009

WCMD shares


Here are a few cards I made using new Gina K. Designs stamps for a few World Card Making challenges on SCS Saturday. I managed to make 6 cards even though we left in the middle of the day to get a few Geocaches, watch a movie (Extract-so funny!) and pick up a new hard drive for my laptop that crashed last week! Well, it ended up really being the memory so now I have more memory and a new hard drive! The next thing I'm looking forward to is getting Windows 7 when it is released in a few weeks with my student discount! Yes!!

This first card uses Hip to be square on some designer paper Linnie Bell collection. Now that I look at this card, I wish I had stamped the sentiment on some solid paper---better fix that before I forget-it just looks a little too busy for my taste. I do, however love the look of the adirondack dimensional pearls around the perimeter of the stamp and around the sentiment. This challenge was to use Beate's weekend sketch (WSC100) and something chocolate (used the expresso dimensional pearls) and a Thank You card.

For my next card, I combined 3 challenges (Flourishes sketch) and (Gina K. Designs Color Challenge of pumpkin spice, chocolate chip and ivory) and the (Crazy 4 Challenges Sew Happy-stitching, C4C5). I just adore these colors, adding some Cosmo Crickett Earth Love paper! I used A Year of Leaves for this Get Well card, which will go out this week to a gal on STV who will be having surgery. I love using my new sewing machine, in fact I also made a few Christmas gifts this weekend using it too I will share in the future with y'all.

Did you see StampTV has a new IDEA CENTER? You have to check it out, there is a ton of inspiration, samples by the illustrators, tip sheets for all the sets Gina sells in the store.

Hope you have a great week!! Pin It

Saturday, October 3, 2009

TE Release Day: Holiday Wonder & Worldcardmaking Day!


Happy TE Release Day and World Card Making Day!

Today the Baker's Dozen are sharing projects made with the new SASI set Holiday Wonder - I just love Jessie Oleson's illustrations of all things Cuppie, but this time there's only 1 itty bitty cuppie making an appearance this Christmas!
On my first card, which happens to be the feature in the TE Newsletter is a mini card using the cute snowman (or snowgirl in my case because she's wearing pink) in the set and a coordinating treat container (using the clear favor circles in the TE store). She has a big selection of favor boxes that you can use to whip up some cute favors for co-workers, your kid's classroom, neighbors and more! In addition to that, all the die cut boxes are available in a lot of the prism colors. All I did for the circle was cut my pattern paper (Jolly by Golly by Cosmo Crickett) down to size and round the corners. I cut out the middle with a spellbinders circle die and the paper is adhered between the hard plastic. But before I shut it closed, I added some of my favorite little mint chocolates with white sprinkles I picked up at the grocery store. I then topped the container with some coordinating ribbon from the Christmas Key Ingredients, and adhered a red sparkly fluffed chipboard snowflake on top of that with a button in the center. Voila! Treat ready to gift and for just $5.00 for 10 containers, you can make each treat for less than 75 cents including all the other supplies and the bonus is that it is handmade!

My next card uses the snowgirl again! I know--I can't get enough of her in pink! I used the rolling snowhills from the Jolly by Golly paper and some of my favorite rose satin ribbon in the TE store. The inspiration for this photo came from the Fall to Layout sketch (FTL60) from a few weeks ago. I love those clean & simple sketches!

Here is a picture of the back of my card - it is available as a free digital download for you to run your cardstock through your computer for your holiday cards to have personalization. All you have to do is sign your name! Details are on Taylor's blog for the download.


I have one last card to share with you because I had so much FUN stamping with this set! I love that Jessie illustrated a house for Cuppie! I used the Jolly by Golly 6-inch stack I have for my red & white snowflake background, which I adhered to my yellow green prism layer. Then I popped the house on it with foam tape because I wanted dimension from the window (see my paper-pieced curtain?) so you can see the cute Christmas tree through it. What you may not be able to see from the angle of the photo but I layered the green door and cut it out so that cuppie is peeking out from the door to go get his morning mail. I added stardust stickles for the snow and liquid pearls around the sentiment.


Happy World Card Making Day!

We hope you've set aside some time today to make and mail out some cards in celebration of World Card Making Day! Taylored Expressions wants to help you celebrate in 4 ways

1. Free digital download. Head over to Taylor's blog for a free digi-stamp for the backs of all your holiday cards.

he2. Free card kit with all purchases in the TE Store today only. Orders must be received by 11 pm PST October 3rd to receive the free kit pictured here. It will not appear in your cart, but we promise it will be in your package.

3. WCMD Challenge and Prize on the Stamp a Sweet Impression Blog! Hurry because the deadline to enter is Sunday night!

4. The Taylored Expressions Christmas Release - see below for all the details on three new holiday stamp sets, our Christmas Key Ingredients and MORE!
In addition to all this goodness:
**2008 Christmas stamp sets, Season's Sweetings (click to see the gallery of inspiration) and Home Sweet Home (click to see the gallery of inspiration) are available for 25% off October 3rd - October 5th.**

We'll also have several other products on sale at the store from 15%-25% off. Check out What's the Deal category in the store.
Thanks for sticking with me for this LONG post - one more thing! Go check out all the sweet inspiration by the design team today:
Pin It

Friday, October 2, 2009

TESC85: Wings of Joy Sneak Peek


It's a triple bonus day!! It's Friday, Taylored Expressions Sneak Peek Day 2 and the sketch challenge!!

Today the Baker's Dozen are sharing creations made with the Whimsical Wishes set Wings Of Joy, illustrated by Nancy McKinney! It's a wonderful collection of various sized birds in holiday settings and sweet sentiments. On my card today, I used the little birdhouse decorated with lights and 2 cardinals perched on it. There is also a little 'snow' which I covered with liquid pearls.

I love the layout Taylor came up for this, but you will see I made my focal image much bigger to accomodate the birdhouse, which slides freely in the circle because I attached it to the scallop die with 3 jump rings. Wish you could see it in action.

Also used on my card is patterned paper by Cosmo Crickett, Jolly by Golly which happens to come in the Christmas Key Ingredients which will be available tomorrow!
On my second card, I combined the cardinal birds decorating the (suspended) tree branch from Branching Out - isn't it funny how you notice little things about your creations LONG after it's made & photographed? I believe I should have executed that a little differently now. What do you think? Does it work still? I hope so because I took a LOT of time paper-piecing all those little socks, mittens and gloves, not to mention sponging of the sky and liquid applique for the snow!

Included in the Christmas key ingredients are:
Prism cardstock colors in Island Mist Light, Blush Red Dark, Classic Yellow Green, Sunflowers Medium and Intense Pink. The neutral is Choice Buttercream. The patterned paper is Cosmo Cricket Jolly by Golly and you will also get 5 yards of coordinating ribbon, 1 pot of Rockstar Red sparkly fluff and several various size chipboard snowflakes. It was fun & easy to use. I smooshed my chipboard snowflake in my glue pad and sprinkled on the sparkly fluff and it stuck real nicely! Then I put a button in the middle to tie in the pink ribbon I chose.

Here is Taylor's sketch for you to try!! Be sure to leave a comment on Taylor’s blog with the direct link to your blog post or gallery upload using the Mr. Linky service so we can check it out! You're always welcome to play with any of these sketches at any time.

Some Personal news to share--this is my last week participating on Taylor's Sketch Challenge Crew; I have enjoyed every week of her fun sketches & working alongside these talented ladies. It was time to make the tough decision that it's best to scale down some commitments because of the growing demands of college and some areas in my life that need my attention. I will STILL be playing along in this as well as other challenges, though so please keep visiting my blog!!

Check out the sneak peek projects from the following ladies:

Taylor VanBruggen Charmaine Ikach Dawn Easton Denise Marzec Jackie Pedro Jodi Collins Karen Giron Karen Motz Laura Frederickson Lori Schmidlin Sankari Wegman Sharon Harnist and Jami Sibley

Be sure to check out the fabulous eye candy the sketch crew has to share with us today:
Taylor Van Bruggen Jackie Pedro Jami Sibley Lynn Mercurio Monika Davis Sherrie Siemens
and come back tomorrow so you can see samples using the last set to be released; the 3 sets, Christmas key ingredients and Christmas Bundle will be available for purchase at 10:00 a.m. CST in the TE Store!
Pin It

Thursday, October 1, 2009

TE sneak peeks: Christmas Blessings


I am so happy to share with you a sneak peek today for the new Taylored Expressions Christmas release; set one of three that will be released is Christmas Blessings in the Lasting Impressions line. It's such a beautiful, spiritual and elegant set that celebrates Christ in Christmas.


The manger scene just takes my breath away because it conjures up what the meaning of Christmas is for me as a Christian. Now, I'm not usually a fan of solid images although there are some fun techniques you can use with them. But for this one, because it is usually a scene as a silhouette just works on so many levels. I embossed my scene with chocolate craft ink and embossed with clear embossing powder. Then, I was able to sponge the night sky, leaving a halo (the light from the Christ child illuminating the dark). I kept my card simple but it took a long time to make because I wanted it to be perfect. My stitching started to get better once I started working on samples for this release (smile).


I sponged antique linen ranger ink on the ivory background, which happens to
be one of the pretty patterns Taylor will be offering by SEI called Christmas Mint. Each of the pieces is either flocked, embosseded highlighted with shimmery foil (you can click on the picture for a closer view). I used a few embellishments on my card which can be found in the TE store: chocolate velvet ribbon, lace trim and Kaiser chocolate pearls. I used prism Suede Brown Dark and Choice Buttercream cardstock for my card.


There was no room for my sentiment on the front of my card, so I put a bigger greeting on the inside of the card. With a powerful image like this, it's not necessary to try to squeeze it on the front! I love the greetings & sentiments in this set and I bet a lot of you will too!!


My next card uses the same Christmas Mint paper, I just love the swirly colorful ornaments on this paper! On this card, I embossed the dove with gold embossing powder and was so excited to see I had some metallic gold thread in my stash so of course I had to stitch on this card too! I love the way the metallic thread exudes elegance on this card. The prism cardstock colors I used on this card are Classic Red and Classic Yellow Green in addition to Choice Buttercream by TE. I also used red glimmer ribbon which goes along nicely with the glimmer from the gold thread. The dies used on this card are Labels 4 by Spellbinders.

Be sure to check out all the wonderful creations the rest of the Baker's Dozen design team have to share with you today:

Taylor, Charmaine Ikach, Denise Marzec, Jackie Pedro, Jodi Collins, Karen Giron, Karen Motz, Lori Schmidlin, Sankari Wegman, Sharon Harnist and Jami Sibley

be sure to check out the design team announcement on Taylor's blog and see ya tomorrow with Taylor's Sketch Challenge and Day 2 previews! Pin It